How to Optimize Sponsored Posts to Do Well in Search Results

Have you wondered how to optimize sponsored posts for SEO while also meeting the brand’s goal for their campaign? Below you will find actionable steps you can take to help your sponsored post perform well in search engine results and searches on Pinterest.

Tips for How to Optimize Sponsored Posts to Do Well in Search Results - Use these on-page SEO tips to improve your ranking on SERPs and Pinterest.

When I write a sponsored post, I strive to create a piece of evergreen content – something that will live on long after that sponsored campaign is over. It is not only good for me because of the additional ad income I make on banner ads, but the brand benefits from the additional exposure.

How to Optimize Sponsored Posts for SEO

One of the keys to having a successful long-term post is having one that does well in search results on search engines and search results on Pinterest. Below are some Search Engine Optimization (SEO) tips for sponsored posts and some ideas for helping your posts to be found in Pinterest searches.

Choosing Keywords for Your Sponsored Post

Select your keyword phrase carefully. Put as much thought into choosing your keyword phrase for a sponsored post as you would an anchor post on your site. Think about what words people would use in a search to find that content. If you’re not sure, ask yourself: What question does your post answer? What problem does it solve? Once you know what your post is the solution to, you will be in a better position to figure out what words people will use to search for that solution and use them to come up with your keyword phrase.

Example: A sponsored post on Miracle-Gro LiquaFeed Universal Feeder:

What question does the post answer? How to get strawberry plants to produce more berries.

What problem does the post solve? Strawberry plants not flowering.

Either one of these answers serve as a good basis for a keyword phrase

Keyword Phrase Chosen: How to Get Strawberries to Produce More Fruit

While this may seem very specific, the more detailed the phrase the more likely someone who has that problem will click on it when they see it in search results. Could I have optimized the post for “how to fertilize strawberries”? Yes, but in this case, the fertilizer is one of the solutions, not the only solution to the problem. So somebody who landed on the post looking for how to fertilize strawberries might be put off by all the additional information. When somebody lands on your page from a search result and stays for a short time before going back to the search results to look some more, they signal the search engine that your post wasn’t helpful which can hurt your standings in the Search Engine Result Pages (SERPs).

On a regular post, I often factor in how much certain keyword phrases can earn in ad income from Cost-Per-Click (CPC) Ads, but I turn off all ads inside sponsored posts, so I do not worry about how much brands are bidding on keywords when I choose my keyword phrase for a sponsored post.

SEO Title: Strawberry Growing Tips: How to Get Strawberries to Produce More Fruit

Choosing a Title for Your sponsored Post

You can actually have multiple titles for your post: the title that is at the top of your post on your blog, the SEO title (this is the one that shows up in search engine results), and the social media title (if you use a plugin like Yoast or Social Warfare).

Create either an informative or engaging post title that includes your keyword phrase. While it is tempting to use the brand name or hashtag in the post title, I discourage from doing so. Hashtags rock Twitter and Instagram but are off-putting in post titles. When you include the brand name, you may unintentionally exclude people who don’t recognize the brand name or feel so loyal to another product that they skip over your post even if the product in your sponsored post is a better solution to their problem then what they are currently using.

In my sponsored post for Melt Organic, How to Make Fluffy Dairy-Free Frosting, the keyword phrase is “fluffy dairy-free frosting” and the SEO title is “How to Make Fluffy Dairy-Free Frosting – Recipe and Tips”. The main question this post answers is: How do I make a fluffy dairy-free frosting? However, the product solves another problem as well – Melt is also soy-free. Many people who avoid dairy also avoid soy. If somebody is searching for a dairy-free frosting recipe thinking that they are going to use coconut oil in the recipe (because many dairy-free margarines contain soy) and I mentioned a margarine brand, they might skip over my post because of a preconceived idea that margarine has soy. But my title encourages them to click-through where they will discover that the main ingredient in Melt is coconut oil and the combination of dairy-free, soy-free oils used in Melt makes it perform more like butter than coconut oil alone.

More On- Page SEO Tips for Sponsored Posts

Use Keyword Phrase early in your post:

In addition to using your keyword phrase in your post title, you will also want to use it in the first paragraph of your post, in the first sentence if possible. You can even include it in your disclosure:

“I created this fluffy dairy-free frosting recipe as part of a sponsored post for MELT® Organic.”

Headings:

While there is some debate about whether putting your keyword phrase in an H2 or H3 helps with SEO, it does help with readability. Headings make it easier for your readers to skim and find exactly what they are looking for which can actually help keep them on the page longer. If your post is hard to navigate, they may click back to the SERPs without finding what they were looking for even if the information they needed was in your post.

Secondary Keywords and Supporting Keywords:

Use your keyword phrase naturally throughout your post, but be sure to not overuse it. Use synonyms and secondary keywords so your post doesn’t become too repetitive. Also, use supporting keywords naturally in your post.

Meta Description:

While we can’t guarantee that the search engines will use the meta description that we write, you can use your keyword phrase and supporting keywords naturally in the meta description. Your meta description can make the difference between someone clicking through to your post or passing over it and clicking on a more engaging meta description of another post in the SERPs.

Optimizing Images for SEO and Pinterest Searches:

Taking a little extra time on your images can significantly improve your chances of being found in image searches on Search Engines as well as on Pinterest. While many of us treat Pinterest as a social media channel, it is basically a search engine.

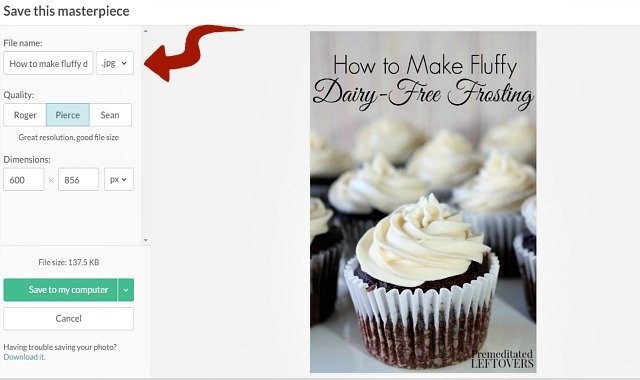
You should save the main image used in your sponsored post with the keyword phrase as the image file name instead of leaving it as IMG1045 or using a shortened name like DF-Icing-3.

Use a keyword phrase in the image file when saving the image for a sponsored post

When you upload the image, write 2 – 3 natural sentences with one of the sentences including the keyword phrase as the alternate text for the image.

On Page SEO Tips for Sponsored Posts by Alea Milham

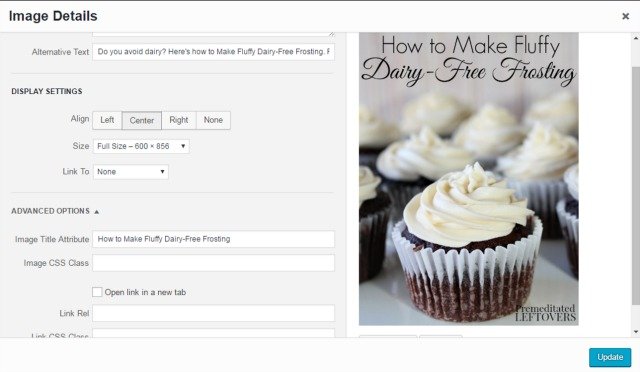
Use variations or supporting keywords in the image file names and alternate texts for the other images contained in the sponsored post.

Use keywords and secondary keywords in your alternate text on images

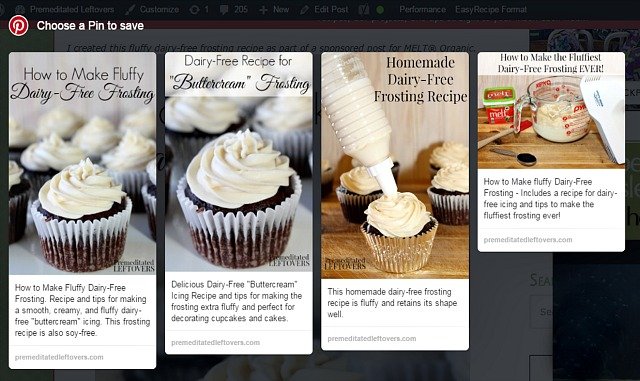
Using keywords and secondary keywords such as “icing” and “buttercream” in your alternate text on images and supporting words such as “decorating cupcakes” tells the search engines what these images are about. Having 2 – 3 sentences that include keywords, ensures that when someone pins one of your images their pin will have a good pin description that has a better chance of doing well in Pinterest searches.

Turn Off In-Post Ads:

In a sponsored post, you don’t want people clicking away from the post on ads. You want people to either click on the brand’s links or you want them to share the post. When they share the post it provides social proof that you have written a helpful article which helps your post not only on the social media channel that it is shared on but it also helps in the search engine results.

Internal Links:

Do you have related posts on your site? If so, take some time after your sponsored post goes live to link to your sponsored post from those related posts that are already on your site. This helps spread some link juice to your sponsored post.

Are you interested in learning more about monetizing your blog? Join our Strategic Blogging Mastermind Facebook Group.

How to Turn an Image into a Short Video

Have you seen the memes that are actually very short videos? Would you like to extend your reach on your Facebook page with one of these videos? In the below video, I will show you how to turn an image into a video that you can use on Facebook.

Use this tutorial for How to Turn an Image into a Short Video to learn how to extend your reach on Facebook with short videos created from memes.

popular pin for blogging tips and increasing Facebook engagement

Why create your own mini-videos for Facebook from stock photos or personal pictures?

First, because you own the images and you can make them unique to your personality, brand, or audience.

Second, you have probably noticed that videos get greater reach on your page than an image. That is because viewing a video counts as engagement, even if the person does not like, comment, or share. And the more engagement a post gets, the more Facebook shows it to your followers.

Third, increased shares. Other page owners who want to share it with their followers, have to share it from your Facebook post. They cannot download it from your page (easily) and upload it to their page in the same way they can if you just uploaded an image. If you have ever had a unique image that you created for your page taken by another Facebook page admin, you know what I am talking about!

While it is not as fast as just creating an image for your wall, the extra couple minutes it takes to turn your image into a video can pay off in much greater reach for that post.

How to Turn an Image into a Short Video

Items Needed:

An image you own – I use Stock Photo Secrets to purchase inexpensive images.

PicMonkey – There is a free option, but I use the paid version which costs $33 a year. If you need help creating a meme using PicMonkey, watch this tutorial.

A Video Editor – I use Camtasia, but there are free video editors. In fact, you may already have a free video editor installed on your computer. Filmora is a free option if you do not have a video editor already.

Directions:

First, turn the image into a Meme. If you need help watch this tutorial on turning a stock photo into a meme.

Watch the below video as I walk you through the entire process of turning a photo into a mini-video for sharing on Facebook or Instagram.

popular pin for blogging tips and increasing Facebook engagement

I do not use music. If you choose to add music, make sure it is music that you own and are allowed to use on your videos. You don’t want to have Facebook take down your video because you don’t have permission to use the music.

I do not post more than one of these types of videos a day. You want a variety of post types on your Facebook page. It is also important to test new post types and make sure your audience likes them before you jump in with both feet. Remember every audience is unique. You want to create a mix of content that appeals to your followers rather than just replicate another page’s approach.

Your turn!

Which memes have resonated with your Facebook followers?

Which memes have performed the best on your page? That is a good place to start when coming up with your mini-video. Search for similar types of images on a stock photo site. Or write a quote on a blank canvas in PicMonkey. If you use an image, choose one where the “trigger” object is in clear focus. Make sure there is room on the image to add text.

I would love to see the videos you create! Share a link to a video you create from an image in the SBA Strategic Blogging Mastermind.

How to Turn Stock Photos into Memes or Funnies

Would you like to be able to share more original memes or funnies on Facebook or your other social media channels? In the below video I will show you how to turn stock photos into memes or funnies.

How to turn a stock photo into a Meme or Funny Picture for Facebook.

popular pin for blogging tips

Why create your own funny images from stock photos? Because you own them and you can make them unique to your personality, brand, or audience.

You can also put your own branding or logo on the image you create rather than include the meme generator’s branding. And if Facebook decides it doesn’t like a particular type of meme generation service, your image doesn’t get caught in the algorithm change.

While it is not as fast as using a meme generator or an E-cards creator, it allows you to create an image that will stand out from crowd.

How to Turn Stock Photos into Memes or Funnies

Items Needed:

An image you own – I use Stock Photo Secrets to purchase inexpensive images.

PicMonkey – There is a free option, but I use the paid version which costs $33 a year.

Directions:

Watch the below video as I walk you through the entire process of turning a vertical stock photo into a humorous square image appropriate for sharing on Facebook or Instagram.

Your turn!

What topics resonate with your Facebook or Instagram followers?

What images come to mind when you think of those topics? Search for them on a stock photo site. Look for images where the “trigger” object is in clear focus. Also make sure that the image does not have a busy or distracting background.

What sayings or expressions come to mind when your think of your key topics? I keep a running list of funny expressions that my friends and I use during our daily life, so when I am stumped on text, I can look through the list for inspiration. If you use a quote, be sure to include an attribution.

I would love to see the images you create! Share your image or a link to your social share with the image in the SBA Social Media Strategies Facebook Group.

How to Update Old Blog Posts Mini-Course

How to Update Old Blog Posts - Free Webinar Series

Are you exhausting yourself churning out new content for your blog? Do you spend so much time creating new content that you barely have time for social promotion and your email list? You are working harder than you need to! In a fraction of the time it takes to create a new post, you can update an old blog post.

If you have been blogging for a couple years, you are sitting on a wealth of content. Instead of constantly creating new content, you can mine your old posts for gems that you can easily update and then reshare with your readers. In fact, some of our most original ideas are from our early days of blogging, but we don’t promote those posts because we look back and are embarrassed by some of the newbie mistakes we made. Let me show you how to quickly update those old posts.

In the first video, I share my simple guide for choosing specific posts to update based on which ones have the greatest chance of bringing you traffic and increasing your income. I also share the format I use to quickly update those posts while optimizing them for SEO.

In the second video, I will show you tricks for updating old images when you don’t have time to stage and take new photographs. I will actually take you through step-by-step what I do to make those old photographs usable in your updated posts.

Finally, in the third video, I share tips for monetizing your old posts with ads and affiliate links. I share types of ads to use in your posts to increase your ad income. I also share where to place affiliate links to increase your click-through rate.

How to Update Old Blog Posts Mini-Course

Session 1: How, When, and Why to Update Old Blog Posts

Session 2: Tricks for Updating Old Images

Session 3: How to Monetize Old Blog Posts

The Free Mini-Course: How to Update Old Blog Posts Video Course also contains free printable checklists and guides.

How to Monetize Old Blog Posts, images, and monetize old blog posts

If you would like access to the printables and would like access to the videos, then sign up for the Free How to Update Old Blog Posts Video Course.


How to Create Engaging Pins

Do you wish more people clicked on your pins and visited your blog? Don’t we all! Well there are some things you can do to increase the click through rate on your pins.

You can find tips for How to Create Engaging Pins as well as a few other tips that will encourage people to click through and visit your site.

To increase the number of people who visit your site from your pins,you need to create engaging pins that will entice people to want to find out more about the topic by reading your post. To do this you need capture the essence of your post with your image and you need to convey the idea with text overlay. You also need to create a description that has keywords that will both help people find it your pin in searches while inviting them to your post to learn more on the topic.

You can find tips for creating engaging pins as well as a few other tips that will encourage people to click through and visit your site in the video below.

How to Create Engaging Pins

Super Fast Review of Pinterest

  • Create boards for each category on your site.
  • Use keywords in description, and pick a category.
  • Don’t waste time making custom board covers. Just pick the best image from pins on the board.
  • Make images at least 600 pixels wide and at least 800 pixels tall, but a ratio of 2:3 is better
  • Pin NEW post to one of YOUR boards

Creating Engaging Pins

  • Capture the essence of the post with your image.
  • Add a text overlay.
  • Add your logo.
  • Write a good pin description – at least 2 – 3 sentences long. Work specific and general keywords into your description.
  • Include a gentle call to action.
  • No #hashtags
  • Don’t include URL or blog name in description.

Long Pin vs. Short Pin

Long pins may get a lot of repins, but examine the click through rate to analyze if it is really working for you. You may want to consider making both a 600 x 900 pin as well as a 600 x 1200 pin and compare how they do.

While a pin that gains a lot of repins can help you increase your followers on Pinterest, ultimately you want people to click through to your site so have an opportunity to add them to your email list.

Combine these tips for creating engaging pins with the strategies for navigating the changes on Pinterest to increase traffic to your site from Pinterest.

Strategic Blogging for Traditional Bloggers

I share many more Social Media Strategies in the Strategic Blogging Course. Below is information about 4 of the 12 modules in the Strategic Blogging Course where I share tips for growing, monetizing, and increasing engagement across your social media channels.

Module 3 – Increasing Social Media Engagement

In module 3 we will discuss ways to increase engagement on your social media channels, how to create pins that drive traffic to your site, how to use Twitter to attract brands, ways to use Facebook even when it isn’t bringing you a lot of traffic, why you should use Instagram, and more.

Module 7 – Sponsored Content on Social Media

In module 7 we cover ways to monetize your social media channels, types of sponsored content available to bloggers on social media channels, where to find social media work, and best practices for paid work on social media.

Module 8 – Growing Your Social Media Platform

In module 8 we cover authentic ways to increase your following on Pinterest, Twitter, Facebook, and Instagram.

Module 10 – Blog & Time Management Techniques

In module 10 we cover creating a long-term editorial calendar and how to develop a plan for updating old posts, but we also explore scheduling tools, discuss what to automate, and present ways to recycle content to maximize its use across your platform.

You can find out more information about the Strategic Blogging Course here.

Strategies for Navigating the Changes on Pinterest

There have been some changes recently to Pinterest’s feed and on Pinterest mobile. While many bloggers are worried about the new algorithm and the changes on Pinterest mobile, in the below video I am sharing some positive things that I see in these feed adjustments and some strategies you can use to increase engagement on your pins. I am also sharing tips for reinvigorating your personal boards if you have neglected them in favor of group boards in the past.

Strategies Bloggers can use to deal with the Changes on Pinterest.  Tips for increasing engagement on pins and reviving your personal boards.

At the bottom of this post are two screen shares. The first one walks you through how to find top performing boards using Tailwind and the second one walks you through how to loop a board using the looping feature on BoardBooster.

Strategies for Navigating the Changes on Pinterest

Links mentioned in the video:

How to Find Pins with High Click-Through Rate in Pinterest Analytics:

To find your pins that people are clicking on the most, go to Pinterest Analytics .

To the right of “Your Pinterest Profile”, click “More”, then click on “Clicks”. You will see your top 5 most clicked on pins. If you click the “show more” button you will see many other top performing pins.

If you don’t have very many pins that lead back to your posts in your top clicked pins, then hover over the “Analytics” button in the top left corner, scroll down and click on “Website”, then click on “Clicks”. You will see the top 5 most clicked on pins from other pinners. If you click the “show more” button you will see many other top performing pins from your website.

Choose a few of these top performing pins, to manually repin to your top performing boards a couple times a day.

How to Find Top Performing Boards Using Tailwind:

While many bloggers use Tailwind to schedule pins, it has other great tools including Board Insights. In the below screen share, I walk you through the process of using this feature to analyze board performance. If you don’t have a Tailwind account, you can try it for free here (referral link).

How to Set Up Looping on BoardBooster:

The looping function on BoardBooster allows you to repin older pins from a Pinterest board back to the top of the same board. Looping Boards is a great way to reinvigorate dead boards. I use it for boards that I don’t pin to very frequently or to get a seasonal board moving again after neglecting it for most of the year. If you do not have a BoardBooster account, you can try it for free here (referral link).

Strategic Blogging for Traditional Bloggers

I share many more Social Media Strategies in the Strategic Blogging Course. Below is information about 4 of the 12 modules in the Strategic Blogging Course where I share tips for growing, monetizing, and increasing engagement across your social media channels.

Module 3 – Increasing Social Media Engagement

In module 3 we will discuss ways to increase engagement on your social media channels, how to create pins that drive traffic to your site, how to use Twitter to attract brands, ways to use Facebook even when it isn’t bringing you a lot of traffic, why you should use Instagram, and more.

Module 7 – Sponsored Content on Social Media

In module 7 we cover ways to monetize your social media channels, types of sponsored content available to bloggers on social media channels, where to find social media work, and best practices for paid work on social media.

Module 8 – Growing Your Social Media Platform

In module 8 we cover authentic ways to increase your following on Pinterest, Twitter, Facebook, and Instagram.

Module 10 – Blog & Time Management Techniques

In module 10 we cover creating a long-term editorial calendar and how to develop a plan for updating old posts, but we also explore scheduling tools, discuss what to automate, and present ways to recycle content to maximize its use across your platform.

You can find out more information about the Strategic Blogging Course here.

Using Keywords to Increase Ad Income

Have you tried following blogging advice on using keywords for SEO (Search Engine Optimization) with limited success? As traditional bloggers we have more options for how we use keywords. We don’t just have to try to find low-competition keywords  so we can easily do well in SERPs (Search Engine Results Pages). We don’t need a complex plan for building authority on a single topic so we can bring traffic to our site through search engines.

As traditional bloggers we don't have to use keywords entirely for SEO, we have more options including using multiple keyword phrases and Using Keywords to Increase Ad Income. - As traditional bloggers we don't have to use keywords entirely for SEO, we have more options including using multiple keyword phrases and Using Keywords to Increase Ad Income.

Why? Because as traditional bloggers we have a vibrant platform that we can use to drive traffic to our sites. Don’t get me wrong, I love my search engine traffic and I am happy to have numerous posts that live on page one of SERPs, but I am not dependent on Search Engines for traffic.

So if I don’t need Search Engine traffic why do I still focus on keywords? Because the keyword phrases I choose to use not only tell the search engines what I am writing about, they inform advertisers what I am writing about. I primarily use keyword phrases to optimize my posts for ad income.

Using Keyword Phrases to Increase Ad Income

Increase ad income by placing the right ads in the right spots:

It is not enough to choose keyword phrases that advertisers are bidding on; you also must place the right ads in the right spots if you want to make a decent passive income with ads.

CPC (cost per click) ads such as Adsense and Media.net perform best where people actually click: inside blog posts.

CPM (cost per mille) ads perform best in highly visible locations. CPM ads perform well as banner ads and at the top of your sidebar, but there are some other high performing spots that you may be overlooking such as footer ads and sidebar ads across from your social share buttons at the bottom of posts.

Strategic Blogging for Traditional Bloggers

I go in much greater depth on these topics in the Strategic Blogging Course. Below is information about 3 of the 12 modules in the Strategic Blogging Course.

Module 1 – SEO for Regular Bloggers

In module 1 we cover the types of keywords, how to find keywords, how to choose keyword phrases, how to optimize a post for more than one key word phrase, how key words can positively impact ad income even when you aren’t on page one of the search results page, and how to use key word phrases in social shares.

Module 2 – Anatomy of a Good Blog Post

In module 2 we cover how to optimize a post for SEO, elements of a good post title, how to optimize post images for SEO AND social media, meta descriptions, authentic link strategies, and more.


Module 4 – How to Monetize your site with Ads

In module 4 we cover the different types of ads, why the type of ad is important, where to place ads, how to create passback ad tags, how to set up waterfalls, how to turn off ads, which types of ads you should avoid, how to find ad networks, and how to create passive ad income without annoying your readers.

You can find out more information about the Strategic Blogging Course here.