How to Turn an Image into a Short Video

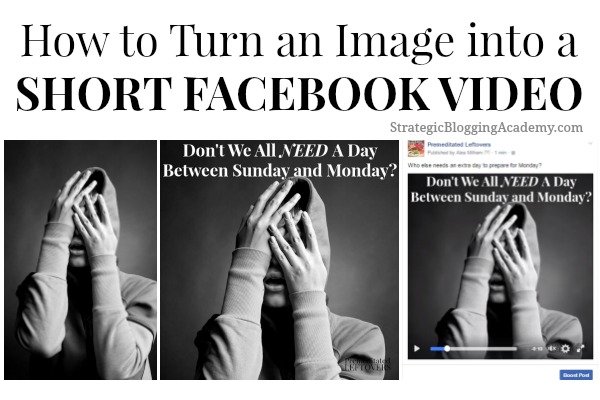
Have you seen the memes that are actually very short videos? Would you like to extend your reach on your Facebook page with one of these videos? In the below video, I will show you how to turn an image into a video that you can use on Facebook.

Use this tutorial for How to Turn an Image into a Short Video to learn how to extend your reach on Facebook with short videos created from memes.

popular pin for blogging tips and increasing Facebook engagement

Why create your own mini-videos for Facebook from stock photos or personal pictures?

First, because you own the images and you can make them unique to your personality, brand, or audience.

Second, you have probably noticed that videos get greater reach on your page than an image. That is because viewing a video counts as engagement, even if the person does not like, comment, or share. And the more engagement a post gets, the more Facebook shows it to your followers.

Third, increased shares. Other page owners who want to share it with their followers, have to share it from your Facebook post. They cannot download it from your page (easily) and upload it to their page in the same way they can if you just uploaded an image. If you have ever had a unique image that you created for your page taken by another Facebook page admin, you know what I am talking about!

While it is not as fast as just creating an image for your wall, the extra couple minutes it takes to turn your image into a video can pay off in much greater reach for that post.

How to Turn an Image into a Short Video

Items Needed:

An image you own – I use Stock Photo Secrets to purchase inexpensive images.

PicMonkey – There is a free option, but I use the paid version which costs $33 a year. If you need help creating a meme using PicMonkey, watch this tutorial.

A Video Editor – I use Camtasia, but there are free video editors. In fact, you may already have a free video editor installed on your computer. Filmora is a free option if you do not have a video editor already.

Directions:

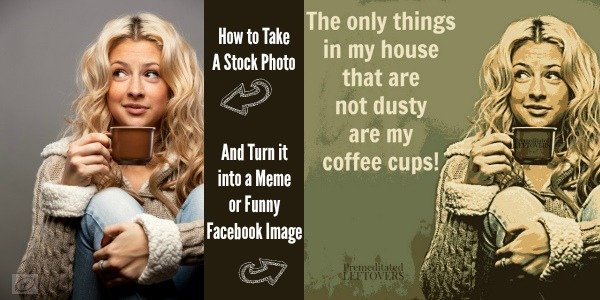
First, turn the image into a Meme. If you need help watch this tutorial on turning a stock photo into a meme.

Watch the below video as I walk you through the entire process of turning a photo into a mini-video for sharing on Facebook or Instagram.

popular pin for blogging tips and increasing Facebook engagement

I do not use music. If you choose to add music, make sure it is music that you own and are allowed to use on your videos. You don’t want to have Facebook take down your video because you don’t have permission to use the music.

I do not post more than one of these types of videos a day. You want a variety of post types on your Facebook page. It is also important to test new post types and make sure your audience likes them before you jump in with both feet. Remember every audience is unique. You want to create a mix of content that appeals to your followers rather than just replicate another page’s approach.

Your turn!

Which memes have resonated with your Facebook followers?

Which memes have performed the best on your page? That is a good place to start when coming up with your mini-video. Search for similar types of images on a stock photo site. Or write a quote on a blank canvas in PicMonkey. If you use an image, choose one where the “trigger” object is in clear focus. Make sure there is room on the image to add text.

I would love to see the videos you create! Share a link to a video you create from an image in the SBA Strategic Blogging Mastermind.

How to Turn Stock Photos into Memes or Funnies

Would you like to be able to share more original memes or funnies on Facebook or your other social media channels? In the below video I will show you how to turn stock photos into memes or funnies.

How to turn a stock photo into a Meme or Funny Picture for Facebook.

popular pin for blogging tips

Why create your own funny images from stock photos? Because you own them and you can make them unique to your personality, brand, or audience.

You can also put your own branding or logo on the image you create rather than include the meme generator’s branding. And if Facebook decides it doesn’t like a particular type of meme generation service, your image doesn’t get caught in the algorithm change.

While it is not as fast as using a meme generator or an E-cards creator, it allows you to create an image that will stand out from crowd.

How to Turn Stock Photos into Memes or Funnies

Items Needed:

An image you own – I use Stock Photo Secrets to purchase inexpensive images.

PicMonkey – There is a free option, but I use the paid version which costs $33 a year.

Directions:

Watch the below video as I walk you through the entire process of turning a vertical stock photo into a humorous square image appropriate for sharing on Facebook or Instagram.

Your turn!

What topics resonate with your Facebook or Instagram followers?

What images come to mind when you think of those topics? Search for them on a stock photo site. Look for images where the “trigger” object is in clear focus. Also make sure that the image does not have a busy or distracting background.

What sayings or expressions come to mind when your think of your key topics? I keep a running list of funny expressions that my friends and I use during our daily life, so when I am stumped on text, I can look through the list for inspiration. If you use a quote, be sure to include an attribution.

I would love to see the images you create! Share your image or a link to your social share with the image in the SBA Social Media Strategies Facebook Group.

How to Create Engaging Pins

Do you wish more people clicked on your pins and visited your blog? Don’t we all! Well there are some things you can do to increase the click through rate on your pins.

You can find tips for How to Create Engaging Pins as well as a few other tips that will encourage people to click through and visit your site.

To increase the number of people who visit your site from your pins,you need to create engaging pins that will entice people to want to find out more about the topic by reading your post. To do this you need capture the essence of your post with your image and you need to convey the idea with text overlay. You also need to create a description that has keywords that will both help people find it your pin in searches while inviting them to your post to learn more on the topic.

You can find tips for creating engaging pins as well as a few other tips that will encourage people to click through and visit your site in the video below.

How to Create Engaging Pins

Super Fast Review of Pinterest

  • Create boards for each category on your site.
  • Use keywords in description, and pick a category.
  • Don’t waste time making custom board covers. Just pick the best image from pins on the board.
  • Make images at least 600 pixels wide and at least 800 pixels tall, but a ratio of 2:3 is better
  • Pin NEW post to one of YOUR boards

Creating Engaging Pins

  • Capture the essence of the post with your image.
  • Add a text overlay.
  • Add your logo.
  • Write a good pin description – at least 2 – 3 sentences long. Work specific and general keywords into your description.
  • Include a gentle call to action.
  • No #hashtags
  • Don’t include URL or blog name in description.

Long Pin vs. Short Pin

Long pins may get a lot of repins, but examine the click through rate to analyze if it is really working for you. You may want to consider making both a 600 x 900 pin as well as a 600 x 1200 pin and compare how they do.

While a pin that gains a lot of repins can help you increase your followers on Pinterest, ultimately you want people to click through to your site so have an opportunity to add them to your email list.

Combine these tips for creating engaging pins with the strategies for navigating the changes on Pinterest to increase traffic to your site from Pinterest.

Strategic Blogging for Traditional Bloggers

I share many more Social Media Strategies in the Strategic Blogging Course. Below is information about 4 of the 12 modules in the Strategic Blogging Course where I share tips for growing, monetizing, and increasing engagement across your social media channels.

Module 3 – Increasing Social Media Engagement

In module 3 we will discuss ways to increase engagement on your social media channels, how to create pins that drive traffic to your site, how to use Twitter to attract brands, ways to use Facebook even when it isn’t bringing you a lot of traffic, why you should use Instagram, and more.

Module 7 – Sponsored Content on Social Media

In module 7 we cover ways to monetize your social media channels, types of sponsored content available to bloggers on social media channels, where to find social media work, and best practices for paid work on social media.

Module 8 – Growing Your Social Media Platform

In module 8 we cover authentic ways to increase your following on Pinterest, Twitter, Facebook, and Instagram.

Module 10 – Blog & Time Management Techniques

In module 10 we cover creating a long-term editorial calendar and how to develop a plan for updating old posts, but we also explore scheduling tools, discuss what to automate, and present ways to recycle content to maximize its use across your platform.

You can find out more information about the Strategic Blogging Course here.

Strategies for Navigating the Changes on Pinterest

There have been some changes recently to Pinterest’s feed and on Pinterest mobile. While many bloggers are worried about the new algorithm and the changes on Pinterest mobile, in the below video I am sharing some positive things that I see in these feed adjustments and some strategies you can use to increase engagement on your pins. I am also sharing tips for reinvigorating your personal boards if you have neglected them in favor of group boards in the past.

Strategies Bloggers can use to deal with the Changes on Pinterest.  Tips for increasing engagement on pins and reviving your personal boards.

At the bottom of this post are two screen shares. The first one walks you through how to find top performing boards using Tailwind and the second one walks you through how to loop a board using the looping feature on BoardBooster.

Strategies for Navigating the Changes on Pinterest

Links mentioned in the video:

How to Find Pins with High Click-Through Rate in Pinterest Analytics:

To find your pins that people are clicking on the most, go to Pinterest Analytics .

To the right of “Your Pinterest Profile”, click “More”, then click on “Clicks”. You will see your top 5 most clicked on pins. If you click the “show more” button you will see many other top performing pins.

If you don’t have very many pins that lead back to your posts in your top clicked pins, then hover over the “Analytics” button in the top left corner, scroll down and click on “Website”, then click on “Clicks”. You will see the top 5 most clicked on pins from other pinners. If you click the “show more” button you will see many other top performing pins from your website.

Choose a few of these top performing pins, to manually repin to your top performing boards a couple times a day.

How to Find Top Performing Boards Using Tailwind:

While many bloggers use Tailwind to schedule pins, it has other great tools including Board Insights. In the below screen share, I walk you through the process of using this feature to analyze board performance. If you don’t have a Tailwind account, you can try it for free here (referral link).

How to Set Up Looping on BoardBooster:

The looping function on BoardBooster allows you to repin older pins from a Pinterest board back to the top of the same board. Looping Boards is a great way to reinvigorate dead boards. I use it for boards that I don’t pin to very frequently or to get a seasonal board moving again after neglecting it for most of the year. If you do not have a BoardBooster account, you can try it for free here (referral link).

Strategic Blogging for Traditional Bloggers

I share many more Social Media Strategies in the Strategic Blogging Course. Below is information about 4 of the 12 modules in the Strategic Blogging Course where I share tips for growing, monetizing, and increasing engagement across your social media channels.

Module 3 – Increasing Social Media Engagement

In module 3 we will discuss ways to increase engagement on your social media channels, how to create pins that drive traffic to your site, how to use Twitter to attract brands, ways to use Facebook even when it isn’t bringing you a lot of traffic, why you should use Instagram, and more.

Module 7 – Sponsored Content on Social Media

In module 7 we cover ways to monetize your social media channels, types of sponsored content available to bloggers on social media channels, where to find social media work, and best practices for paid work on social media.

Module 8 – Growing Your Social Media Platform

In module 8 we cover authentic ways to increase your following on Pinterest, Twitter, Facebook, and Instagram.

Module 10 – Blog & Time Management Techniques

In module 10 we cover creating a long-term editorial calendar and how to develop a plan for updating old posts, but we also explore scheduling tools, discuss what to automate, and present ways to recycle content to maximize its use across your platform.

You can find out more information about the Strategic Blogging Course here.